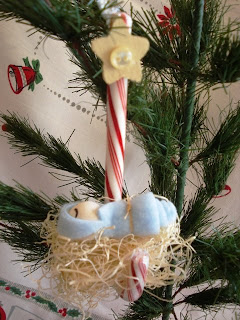
Baby Jesus Candy Cane Christmas Ornament How-To

Here's a tutorial to make sweet baby Jesus ornaments:
Materials: 3/4" round wooden balls
blue felt
like-sized small wooden stars
flesh-colored acrylic paint
yellow acrylic paint
black permanent marker
small button as star decor
raffia
natural excelsior "moss"
silver thread or coordinating yarn
candy cane

You'll also need glue or a hot glue gun, paint brush and scissors

Begin by painting the wooden balls with flesh-colored paint and the stars with yellow paint. When dry, draw two sleeping eyes on the ball.
Meanwhile, cut small pieces of felt and make little rolls to represent the baby's body; tie with a tiny piece of raffia.

Next, glue the wooden ball onto the top of the body roll of felt; if you wish, you can also cut a small wedge of felt to glue over like a little swaddled hood on the baby's head, but I think it looks cute without it as well. Glue the little button onto the star; I used a soft yellow.

Take the silver thread or your yarn and tie it to the top (uncurved end) of your candy cane; then, wrap the long end of the thread around and around the cane several times. End it in front, leaving a long loop standing above it to use as a hanger for the ornament, and secure the string with a drop of glue. Note: experiment with this step; the last time I did this with a group of people, everyone had a different way to wrap and make their loop that they were most happy with!
After it's dry, add more glue and secure your yellow star over the string.

Now you're ready to assemble. Grab a small bunch of raffia and "mold" it with your fingers into a little "nest" for the baby. Glue the baby onto the raffia and you're finished!

Yes, these are time consuming but worth it, don't you think? If you don't have the time, there are still a couple of them left in my Etsy shop!


Comments