Posts

Showing posts with the label tutorial

A coffee filter flower wreath

Image
I've been wanting to make coffee filter flowers forever.  The other day when I took this photo I decided to make it happen! It took me a few days, but I bought some coffee filters and spent a quick few minutes dyeing them in my kitchen sink.  I used these four colors of paint and lots of water on plain, bright white coffee filters. I did all 200 that were in the package.  I did about 40 at a time, and after each pile, I added more paint to darken the next batch. I set them outside in piles to dry.  That worked for about 30 minutes, until the wind came up and I had to move them inside!   I ended up having to let them dry overnight, but that was fine because I ran out to time to continue working on them the first day, anyway. The next time I had a chance to work on the wreath, I began making flowers.  Fist I used a thin quilting tape, but I found it really hard to work with (it's old, so maybe it was brittle...) so I switched to regular masking ...

My beautiful mess

Image
...or, perhaps I should have titled this, My first attempt at dyeing a garment . You may remember this pale blue petticoat I bought at an antique show last summer.  It's two layers -- one white, one blue, and very old.  I've kept it for the past year, trying to find something I would love to wear it with it...but finally decided it needs to be black .  Or maybe charcoal gray.  At least, not blue. So I bought myself a couple of packages of black Rit powder dye and looked up How to Dye a Slip online.  I found a few guides and went to town!  Or, to the laundry room. Actually, I went to the laundry room and the kitchen, because as a first step I needed to mix the dye in a big pot on the stove.  The directions are on the box of Rit, and I added vinegar because the slip had nylon in it. If you're going to do this, there are two things to remember: first, don't use a wooden spoon you are attached to (I didn't), and, second, be ready to clean the...
Image
I thought in honor of my recent Blogaversary, I'd re-run a tutorial I posted two years ago: How to make Baby Jesus Candy Cane Ornaments Lots of fun, and one the kids can help with, too! Stay tuned for news about this!

Christmas Fun All Over the WWW

Image
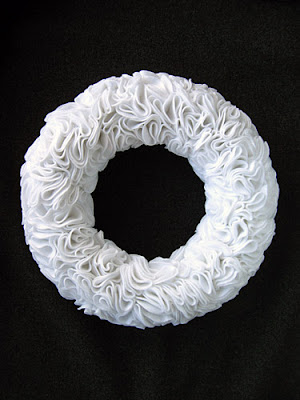
I really hate it when I fall behind in reading all my favorite blogs, but I do like it when I spend a few hours catching up and come across a theme of sorts. This time, the theme I found was a bunch of wonderful tutorials, all winter themed, and all generously shared on the blogs of these talented ladies. I'm going to share the links with you, here: A ruffled felt wreath, courtesy of Kristen at Domestifluff . Really cute Advent Calendar idea from Ann at Keepin' Up With the Tatums . Wonderful snowflakes from Karoline at Cherished*Vintage . Thank you to all the bloggers who shared their talent and creativity! Don't you feel so blessed to be able to share in all this wonderful creative energy? I do! If you decide to make any of these, please thank them, and be sure to link back here and show me what you made! Don't forget, you have until 11:59 p.m. MT on December 11 to enter my Blogaversary giveaway here .

The New Me

Image
So, I spent a couple of hours today updating my blog look, and I'm eager for your feedback! Do you like it? (I think it's softer and cleaner looking.) Does it take too long for your computer to load it? I really want to know so I can improve things if that's the case. Also, a couple of people have told me they're having trouble with leaving comments. Please let me know by emailing me (link on the left sidebar under my profile picture) if that is the case! I owe this blog makeover to Missie Zee, who posted a tutorial on making over your blog on her blog, Crafting with Cat Hair . She posted it over the summer, and at the time I was so tied up that I told her it would be a while, but I had it on my list. And, look! I finally got around to it! Thank you so much, Missie! I still have some more things I want to add, such as buttons along the top, a button of my own about this blog, and maybe one of those fancy progress bar widgets to keep me on track. As an aside: the...

I've Got Nothing

In the midst of summer activities I've been thinking, "I've got nothing" compared to the cool finds, projects, destinations, ETC. that you all are blogging about! Such as: Susan from Blackberry Creek Home Arts linked to the quilt Jane Austen made ; you can still find some of the fabric that Makower, UK reproduced from the quilt on eBay. This was news to me, but not a surprise that someone with the patience to write novels like Jane could also labor over a thing of beauty like that quilt! Jen at the Sugared Songbird used Eileen's tutorial to make gorgeous flowers! I'm putting these on my own to-do list. Nikki has a Silly Lunch Ide a that looks like so much fun! Many members of the Etsy Bloggers Street Team are offering discounts this month for their annual Christmas In July celebration ...and Everyone Except Me is going to the beach! I applaud you all for your energy and ingenuity, and most of all thank you for blogging about it all so I can live vic...

Photo Tag Fun!

Image
It's spring break at my house, and my son is off of school for two whole weeks. My husband has also been home, last week and this week, due to a shut down at his company. You know, where they close and make everyone use their vacation or take the time off as unpaid. It's the third time in 7 months his company has done that. It's a Major Bummer. But anyway, my husband and son's "breaks" have overlapped one week, which has been fun. The other day I had a chance to get together with a good friend and her kids for a rare, mid-week visit. She was in the mood to craft but didn't have any special project in mind. So, I packed up all my paper crafting stuff, and printed out a wonderful photo tag tutorial that Nikki had posted several weeks ago on her blog . You must go see her stuff -- it's great! There were three of us - me, my friend and her 11 year old daughter (our sons were otherwise engaged) - and we each made two photo tag folders. We used my...

Baby Jesus Candy Cane Christmas Ornament How-To

Image
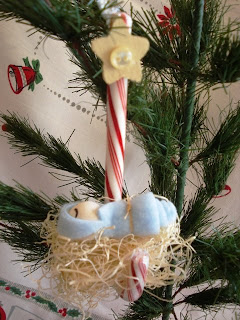
Here's a tutorial to make sweet baby Jesus ornaments: Materials: 3/4" round wooden balls blue felt like-sized small wooden stars flesh-colored acrylic paint yellow acrylic paint black permanent marker small button as star decor raffia natural excelsior "moss" silver thread or coordinating yarn candy cane You'll also need glue or a hot glue gun, paint brush and scissors Begin by painting the wooden balls with flesh-colored paint and the stars with yellow paint. When dry, draw two sleeping eyes on the ball. Meanwhile, cut small pieces of felt and make little rolls to represent the baby's body; tie with a tiny piece of raffia. Next, glue the wooden ball onto the top of the body roll of felt; if you wish, you can also cut a small wedge of felt to glue over like a little swaddled hood on the baby's head, but I think it looks cute without it as well. Glue the l...

Antique Glass Buttons

Image
I'm happy to have a place to share my button collection with other fans. Last night, amid the bustle of holiday preparations and the looming end-of-semester deadlines, I treated myself to some relaxing time with my buttons -- ahhhh. I recently purchased this wonderful "patched" heavy scrapbook paper by American Crafts from their Simply Chic collection; it seemed perfect as a background for some of my heavier glass buttons. The National Button Society recommends using plastic coated wire instead of thread to adhere your buttons to paper, so that's what I did. Here are some close ups of my favorites in glass: Dragonfly Parrot Kitty Cat Red Heart Black Glass with Pretty Cuts Which is your favorite?